How to Clean Your Garden Tools (and Get Them Rust-Free for Good)?

Your garden tools work hard - digging, pruning, trimming, and helping your outdoor space to come alive. But after a few uses (especially in damp or humid conditions), they are covered in soil, sap, and even worse - in rust.
If you’ve ever picked up a pair of shears or a shovel only to find it crusty, dull, or orange-tinged, you’re not alone. Rusty garden tools are a common problem, and if left unchecked, that rust can shorten the lifespan of your equipment, harm your plants, and cost you money in replacements.
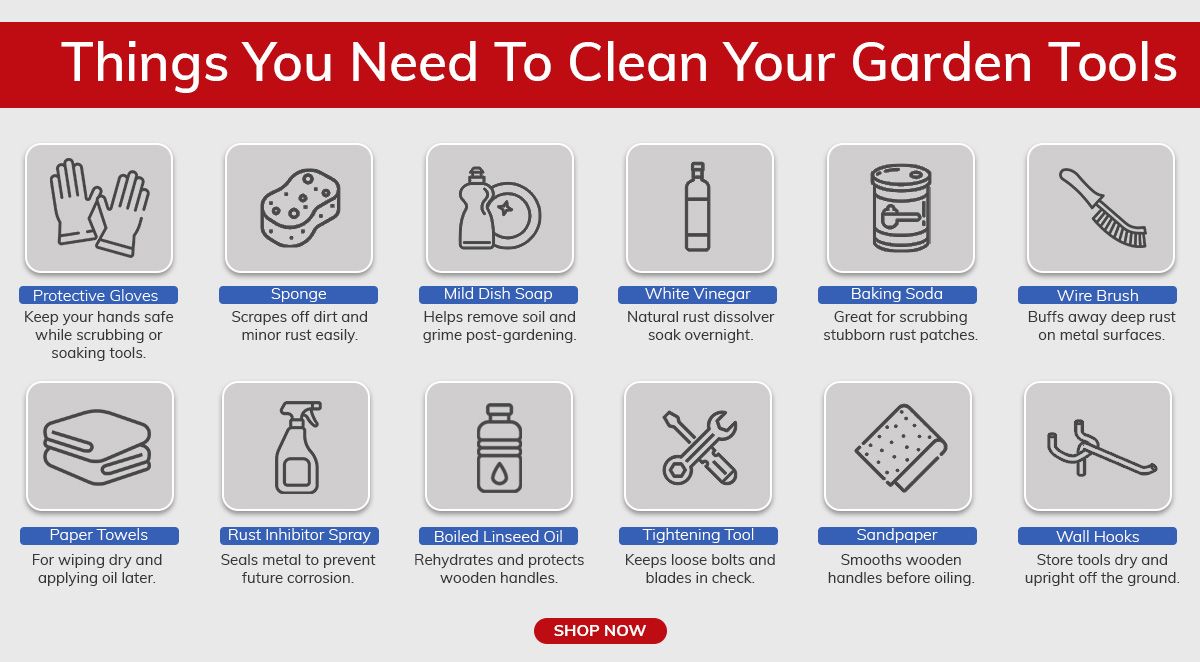
The good news? Restoring your tools doesn’t require fancy equipment. With just a few simple materials (most of which you probably already have at home), you can clean your garden tools thoroughly and remove rust safely and effectively.
Let us show you how to clean your garden tools, get them rust-free, and keep them in great condition for the long haul. Whether you're a weekend gardener or a gardening pro, these tips will help you protect your tools and keep them performing their best for years.
Why Do Garden Tools Get Rusty?
Rust might seem like just an aesthetic issue, but for garden tools, it can be a real performance killer.
Why Do Garden Tools Rust?
Garden tools are typically made of metal, and metal and moisture are not the best of friends. The moment water, oxygen, and soil residue come into contact with your tools, oxidation begins. Add in humidity, poor storage habits, and leftover plant sap, and you’ve got the perfect recipe for rust.
Common causes of rust on garden tools:
- Leaving tools outdoors or in damp sheds
- Not wiping down tools after use
- Storing tools with soil or moisture still on the surface
- Using tools in wet soil or after rain, then skipping the cleanup
Whether you garden casually or use gardening gear every day, keeping your tools clean and rust-free is the key to better results and fewer replacements.
How to Clean Your Garden Tools (Step-by-Step Guide)?
Cleaning your garden tools regularly isn’t just about appearance, it keeps them sharper, safer, and more effective. Whether you're dealing with everyday dirt or deep-set garden rust, this step-by-step guide will walk you through the right process from basic cleaning to rust removal and restoration.
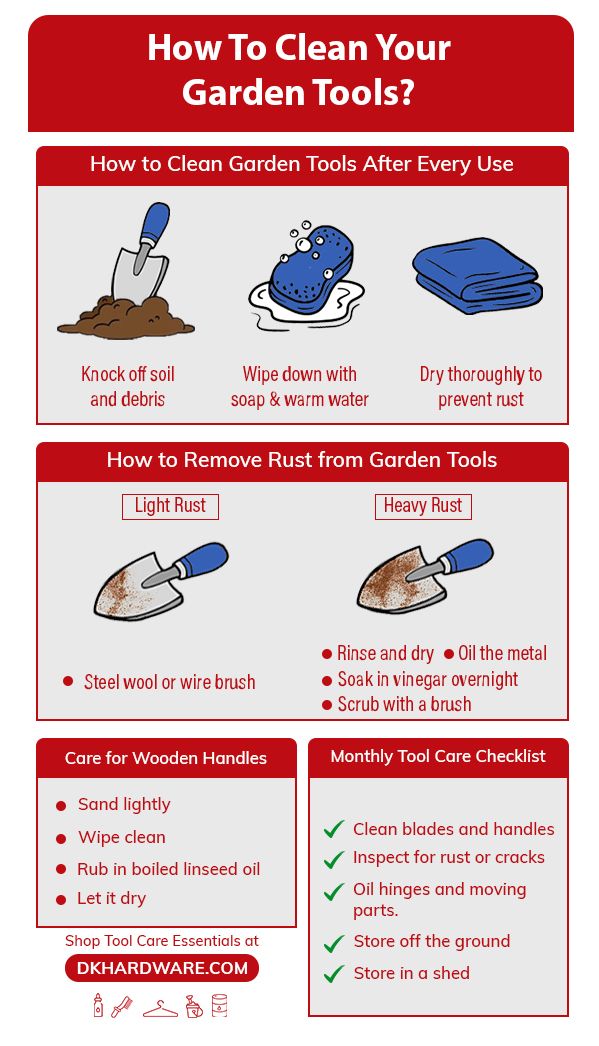
Step 1: Remove Soil and Debris
Start with a dry brush-off. Before using any water or cleaner, use a stiff scrub brush or wire brush to knock off dried mud, grass, or plant matter. Pay special attention to joints and moving parts where grime tends to build up.
Step 2: Wash with Soapy Water
Mix a few drops of dish soap in warm water and scrub your tools thoroughly using a brush or sponge. For sticky sap or plant residue, let the tools soak for 5-10 minutes before scrubbing. This removes oils, dirt, and plant residue that can cause corrosion or disease.
- For tools like pruning shears, open and close them while scrubbing to clean inside the hinge.
Step 3: Disinfect (Optional, but Recommended)
To kill off bacteria, fungi, or viruses, especially if your tools were used around diseased plants, disinfect them using one of these options:
- A solution of 1 part bleach to 9 parts water (rinse and dry thoroughly after)
- Rubbing alcohol (isopropyl) - wipe or soak for a few minutes, then dry
- Household disinfectant sprays
PS: This is especially important for professional landscapers and avid gardeners managing plant health.
Step 4: Remove Rust
For rusty tools, try one of the following methods:
- Soak in Vinegar:
Place your rusty tools in a bucket of white vinegar and soak overnight. Scrub with steel wool or a wire brush the next day to remove loosened rust. - Use a Baking Soda Paste:
Mix baking soda with water into a paste, spread it over rusted areas, and let sit for 30-60 minutes. Scrub with a brush and rinse clean.
Step 5: Sharpen Blades (if needed)
Use a sharpening stone or metal file to bring dull blades back to life. Always sharpen in the direction of the blade’s edge and follow the original bevel.
- Focus on pruners, loppers, shovels, and hoes.
Step 6: Oil and Protect
After cleaning and drying, apply a light layer of:
- WD-40 or rust-inhibitor spray on metal parts
- Boiled linseed oil on wooden handles
Wipe off excess and let them dry before storing. This will create a moisture barrier and keep tools looking and working like new.
Step 7: Store Properly
Keep tools in a dry, well-ventilated area. Hang them on hooks or store them in a bucket of sand mixed with mineral oil to reduce humidity contact. Storage is half the battle, avoid leaving tools on the ground or in damp garages.
How to Remove Rust from Garden Tools?
Rust is every gardener’s worst enemy. It dulls blades, weakens tool strength, and shortens the life of your investment. But the good news? You can remove rust from garden tools at home using simple supplies and a little elbow grease.
Whether you're restoring old shears or trying to save a favorite trowel, here’s how to get your tools looking like new.
Soak in White Vinegar (for heavy rust)
White vinegar is a powerhouse when it comes to dissolving oxidation. It breaks down rust chemically without damaging the base metal.
How to do it:
- Submerge the rusted metal parts in white vinegar overnight (use a bucket or container).
- After soaking, scrub with steel wool or a wire brush.
- Rinse with water and dry thoroughly to avoid flash rust.
Use a Baking Soda Paste (for light to moderate rust)
Baking Soda is great for small tools or surface-level rust. It is gentle enough for tools with painted or delicate handles.
How to do it:
- Make a paste with baking soda and water.
- Apply generously over rusty areas and let sit for 30–60 minutes.
- Scrub off with a brush or scouring pad, then rinse and dry.
Try Sandpaper or Steel Wool (for spot cleaning)
Perfect for precision work, especially for curved blades or tight spaces, use light, even strokes of sandpaper to avoid over-sanding or damaging the edge.
How to do it:
- Use medium grit to break down rust.
- Switch to fine grit to smooth out scratches.
- Always finish by wiping clean and applying oil or a rust inhibitor.
Commercial Rust Removers (for stubborn corrosion)
If natural methods aren’t enough, there are effective chemical options available. These work fast and penetrate deep, ideal for heavily rusted, vintage tools. However, you must always follow the manufacturer's instructions, use gloves, and work in a ventilated space when using commercial rust removers.
Look for:
- Rust dissolvers
- Naval jelly
- Rust converter sprays
How to Prevent Rust from Coming Back?
- Dry tools immediately after cleaning or use.
- Store in a dry, ventilated space.
- Spray with WD-40 or a rust-prevention oil after each use.
- For long-term storage, rub metal parts with mineral oil or store in a sand + oil mix.
How to Care for Wooden Handles on Garden Tools?
While rust gets most of the attention, wooden handles need just as much love. Without proper care, they can crack, splinter, or even break, making your tools uncomfortable (and unsafe) to use. The good news? A little seasonal maintenance goes a long way.
Here’s how to clean, restore, and protect wooden garden tool handles:
Clean the Handles
Start by wiping the wooden handles with a damp rag to remove dirt and grime. If they’re really dirty:
- Use a little dish soap and warm water
- Scrub with a soft-bristle brush
- Dry thoroughly with a towel & don’t leave them out to air dry for too long
Sand Down Rough or Splintered Areas
Over time, wood can dry out and develop rough patches or splinters. Use fine-grit sandpaper (120–150 grit) to smooth down the entire handle to make it more comfortable to grip and reduce the risk of blisters.
- Focus on any cracked, chipped, or heavily worn areas
- Wipe with a dry cloth after sanding
Rehydrate the Wood with Linseed Oil
Apply boiled linseed oil (choose the best one from our range of primers and sealers) using a clean rag to condition and seal the wood.
How to do it:
- Rub in a generous coat of oil
- Let it soak in for 15–30 minutes
- Wipe off excess and allow it to dry fully
For very dry handles, you may want to apply 2–3 coats over a couple of days.
Store Properly to Preserve the Wood
Even well-oiled handles can get damaged by improper storage.
- Hang tools vertically or store them off the ground
- Keep them in a cool, dry area
- Avoid leaving them out in the sun or rain
Proper storage is the easiest way to protect both the wood and the metal parts of your tools.
Special Cases - Post Poison Ivy & Winter Care
Sometimes your garden tools need extra care - especially after dealing with toxic plants like poison ivy, or when preparing them for extreme winter conditions. Here’s how to tackle those special situations like a pro.
How To Clean Garden Tools Exposed To Poison Ivy?
Poison ivy leaves behind an oily substance called urushiol, which can linger on tools for months, even after they look clean. Touching it later can trigger severe allergic reactions.
- Wear gloves - ideally disposable ones
- Wash tools with hot water and strong dish soap
- Scrub all surfaces with a brush or abrasive sponge
- Rinse thoroughly and dry
- Wipe down handles and blades with rubbing alcohol or a degreasing spray
How to Clean and Store Garden Tools for Winter?
As the winter approaches, taking a little time for seasonal maintenance can keep your tools sharp, safe, and rust-free all year long. Following the given steps will help you keep your gardening tools clean and rust-free throughout the winter season.
- Deep clean tools using the full cleaning + rust removal process
- Sharpen blades and check moving parts
- Apply a light layer of mineral oil or WD-40 to metal surfaces
- Rub boiled linseed oil onto wooden handles
- Store tools in a dry, covered area or hang them indoors.
A dry shed, garage wall, or even a storage closet works better than a damp tool bench or patio.
Shop High-Quality & Efficient Gardening Tools from DK Hardware
Whether you’re trimming hedges, planting herbs, or tackling a full backyard overhaul, your tools work just as hard as you do. Keep them clean, sharp, and rust-free to boost your efficiency, to be safe, and to save money.
Explore DK Hardware’s full range of Outdoor & Lawn products. From oiling kits and rust removers to tool hangers and seasonal storage solutions, get a wide range of high-quality maintenance supplies, tool care accessories, rust-resistant garden gear, and more.